The angle bracket lies next to the casing. A dark layer remains on one side, while the opposite side shines. Before anyone scrapes off the residue, the most important step is already possible: holding both halves together and preserving their original position.
A break creates two related surfaces. Photographing only the more noticeable one means missing out on the other information. Especially with painted parts, it's otherwise difficult to tell whether the adhesive, coating, or base material has been separated.
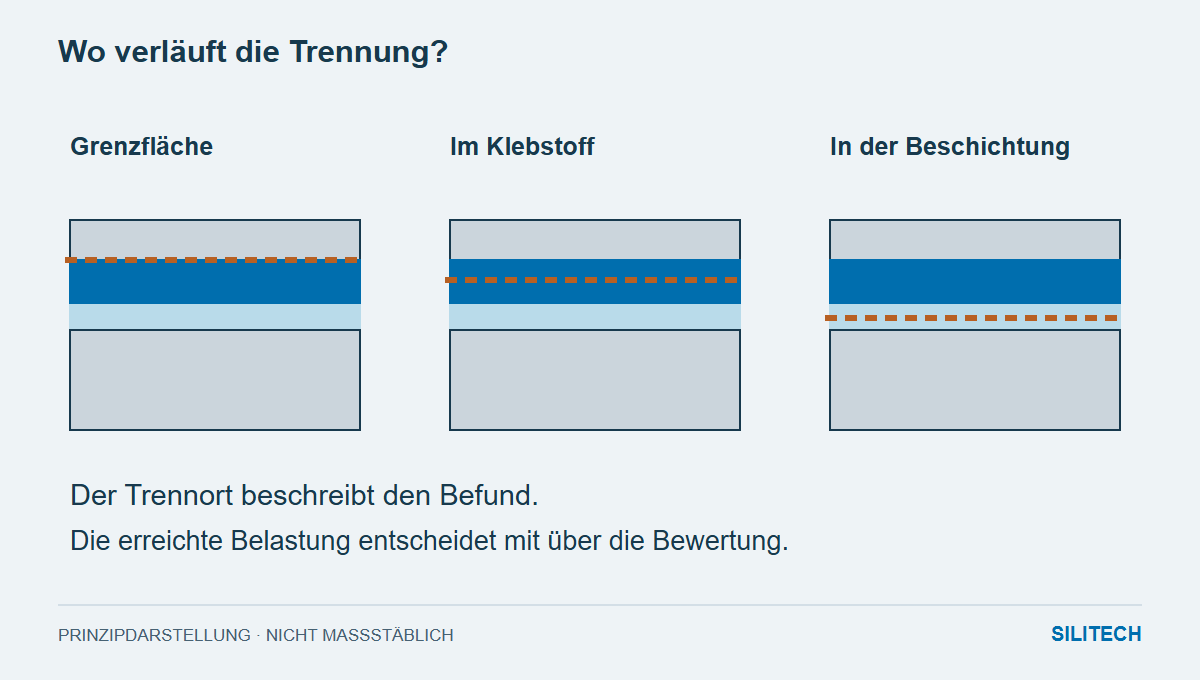
Three failure points – three different questions
In an adhesive failure, the separation occurs at an interface, such as between the adhesive and the surface. In a cohesive failure , it occurs within the adhesive itself. In substrate , a component or part of its structure breaks; this can include a detached coating.
The LOCTITE technical manual explicitly distinguishes between these locations. This distinction is helpful for the investigation: A paint layer that has been torn away from the metal leads to different connection issues than an intact coating from which the adhesive has detached.
Very thin residues can easily remain invisible in a photograph. Therefore, a seemingly bare surface does not automatically indicate a reliably identified adhesive fracture. Mixed fracture patterns are also possible: different zones of the same bond can fail differently.
"Adhesive on both sides" is not yet a quality assessment
A cohesive failure can indicate that the interfaces have transmitted the achieved load. Whether this load is sufficient for the application is another question. A bond can break within the adhesive and still fail far too early.
Therefore, the event itself is essential to understanding the fracture pattern: What force acted and in what direction? Was it a controlled attempt, the insertion of a plug, or a pull on the cable? In the case of a manual test, "pulled by hand" remains the correct description. Estimating the force afterward only makes the finding appear more accurate.
The usable photo pair
The two halves are oriented identically and marked outside the fracture zone. An overall view connects them to the installation situation. A close-up shows the critical zone with a scale positioned to the side. Multiple viewing angles help in identifying reflections.
Loose coating particles and other residues remain associated with the sample. Cleaning, heating, or re-pulling will alter the findings. Such steps should only be performed after the initial state has been restored.
The next question can be derived from the adhesive, surface structure, and manufacturing conditions. For example: Did the coating fail as a layer, or was an edge overloaded by the lever arm? This question is more helpful for the next test than hastily demanding a "stronger adhesive.".
Two practical questions
Does a shiny surface mean that no adhesive stuck there?
Not necessarily. Thin residues and reflections can complicate the assessment. The opposing surface and, if necessary, further investigation are required.
Should I clean the broken halves before shipping?
For root cause analysis, the original state remains valuable. Packaging and further processing are coordinated to preserve residues and their identification.
To deepen the connection
Technical Sources and Conditions
The current product documentation is decisive for processing.